
Whipping up something sweet doesn’t have to mean turning on the oven. Chocolate Rice Krispie Balls are the perfect fix when you’re craving a quick, delightful, and totally no-bake treat. This article is your go-to guide for making these little bites of joy—from gathering ingredients to adding flavorful twists.
Whether you’re planning a festive get-together, looking for lunchbox fillers, or just want a snack that hits the sweet spot, these crispy chocolate bites are here to save the day. We’ll also dive into tips, common mistakes to avoid, and fun ways to present them. Trust us—by the end, you’ll be rolling Rice Krispie desserts like a pro!
Table of Contents
Introduction to Chocolate Rice Krispie Balls
What Are Chocolate Rice Krispie Balls?
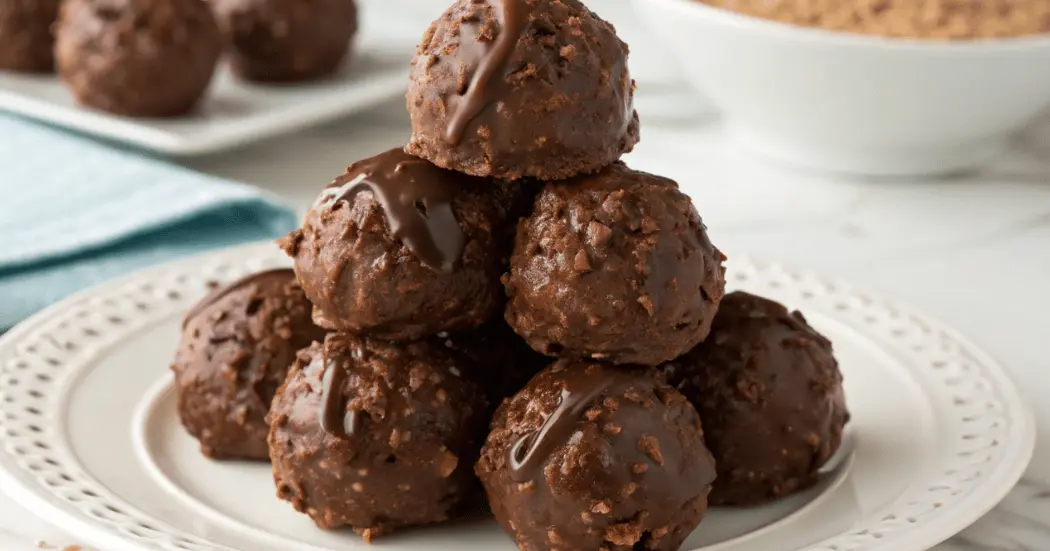
Ever had one of those days when you just want something sweet, chocolaty, and fast? Enter Chocolate Rice Krispie Balls—bite-sized, chewy, crispy, chocolate-coated treats that are as fun to eat as they are to make. They’re made by mixing crispy rice cereal with a chocolatey binder—sometimes peanut butter, sometimes marshmallows, and sometimes just pure melted chocolate.
What makes them stand out from regular chocolate rice krispie treats is their shape and texture. These are handheld, pop-in-your-mouth balls of joy. Perfect for parties, school snacks, and holiday dessert platters, they’re incredibly versatile.
Why They’re a Beloved No-Bake Dessert
There’s something magical about a recipe that doesn’t require baking—especially when it’s this satisfying. These no bake chocolate balls are a hit with both kids and adults. Why? They’re simple, quick to make, and mess-free. No hot pans, no timers, just melt, mix, roll, and chill. That’s it.
Plus, you can add all sorts of flavors—from peanut butter and coconut to sprinkles and crushed candies. With only a handful of ingredients and endless variations, chocolate covered rice krispie balls have become a staple in countless kitchens, especially around the holidays or during last-minute snack prep.
Ingredients and Tools Needed
Essential Ingredients for the Best Chocolate Rice Krispie Balls
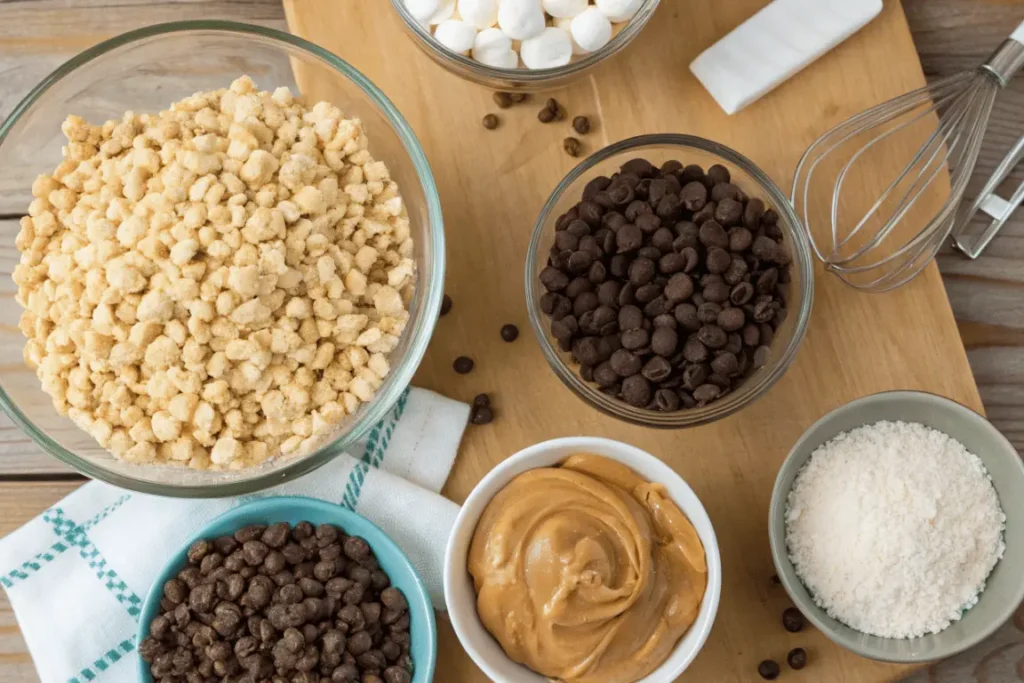
Before diving in, let’s round up the usual suspects. You don’t need anything fancy—just a handful of pantry staples to whip up these chocolatey cereal snacks. Here’s what you’ll need:
- Rice Krispies cereal (or any puffed rice cereal)
- Chocolate chips (semi-sweet or milk chocolate work great)
- Peanut butter (for added richness and that creamy texture)
- Butter or coconut oil (helps melt and bind the mixture)
- Vanilla extract (totally optional, but adds a lovely depth)
- Mini marshmallows or sweetened condensed milk (optional, but fantastic for gooey texture)
The beauty of Chocolate Rice Krispie Balls is that you can swap ingredients to suit your taste—or what you’ve got on hand. No marshmallows? Use more chocolate. Out of peanut butter? Try almond butter or even Nutella.
Optional Add-ins for Flavor and Texture
Want to jazz things up? Add-ins are where the magic happens. Stir in crushed candy canes for holiday flair, mini M&Ms for color, or shredded coconut for a tropical twist. You could even mix in protein powder or chopped nuts if you’re going for a semi-healthy rice krispie dessert.
Kitchen Tools You’ll Need for This No-Bake Treat
Thankfully, you won’t need much equipment—this isn’t a bake-off! Just grab:
- A large mixing bowl
- A microwave-safe bowl (for melting)
- A spatula or wooden spoon
- A baking sheet or tray lined with parchment
- Clean hands or a small scoop for rolling
With everything prepped and ready, making these easy rice krispie balls will be a total breeze!
Step-by-Step Recipe Guide
Preparing the Chocolate Mixture
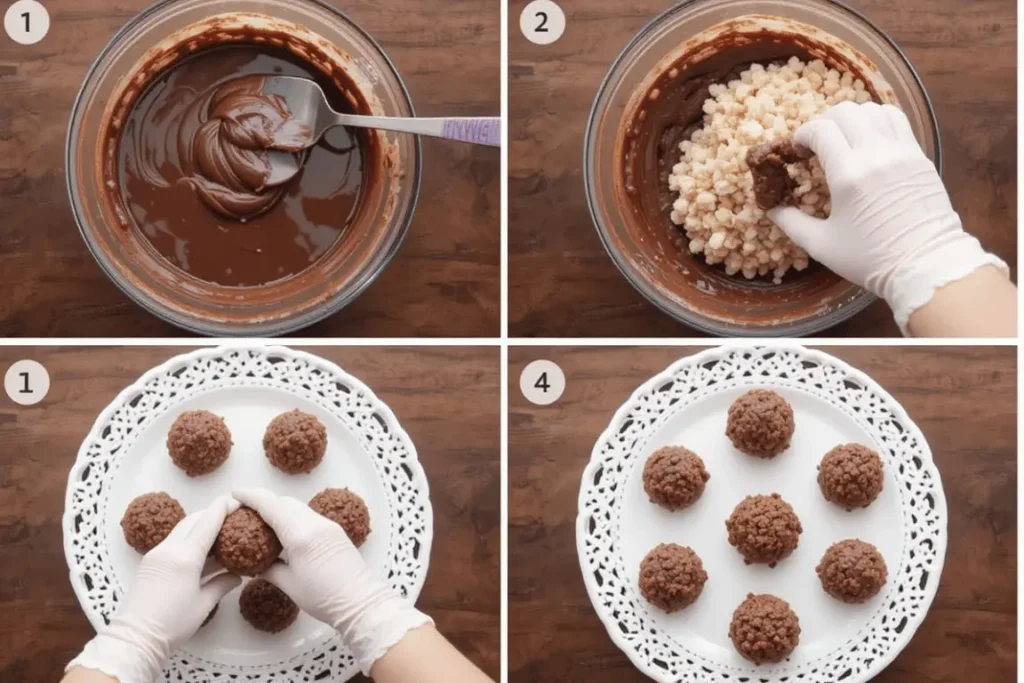
Let’s dive into the fun part—making the actual Chocolate Rice Krispie Balls. Start by melting your chocolate chips with butter (or coconut oil) in a microwave-safe bowl. Use 30-second bursts, stirring in between until it’s silky smooth. If you’re using peanut butter, now’s the time to mix it in too. Stir until the mixture is fully blended and shiny.
Pro tip: Don’t overheat the chocolate. It can burn quickly and turn grainy. Low and slow wins the race here!
Once the mixture is ready, you can also stir in vanilla extract for extra flavor. If you’re using mini marshmallows or condensed milk, add them now while the mix is still warm to help them melt evenly.
Combining with Rice Krispies and Forming Balls
Now pour the chocolate mixture over your Rice Krispies cereal in a large bowl. Gently fold everything together using a spatula. Make sure the cereal is evenly coated—every bite should get some love!
Here’s where the magic happens. Let the mixture cool just slightly so it’s easier to handle, but not too long or it’ll harden. With clean hands or a cookie scoop, shape the mixture into small balls, about 1 to 1.5 inches wide. If things get sticky, lightly grease your hands or dip them in cold water between rolls.
As you roll each ball, place it onto a parchment-lined tray. Keep them evenly spaced so they don’t stick together. You should end up with around 20 to 25 bite-sized treats, depending on the size.
Chilling and Setting for Perfect Texture
You’re almost there! Pop the tray into the fridge and let the balls chill for about 30 minutes. This helps them firm up and develop that perfect chewy-crisp texture that makes Chocolate Rice Krispie Balls so addicting.
Once set, store them in an airtight container. They’ll stay fresh for several days—but let’s be real, they usually disappear way sooner!
So, grab one (or two), and enjoy the crunch, the chocolate, and that little bit of nostalgia in every bite.
Recipe Variations and Flavor Twists
Peanut Butter Chocolate Rice Krispie Balls
Let’s be real—adding peanut butter makes everything better. Peanut butter Chocolate Rice Krispie Balls are hands-down one of the most beloved twists on the classic. Simply stir in ½ cup of creamy peanut butter while melting your chocolate. It brings a smooth, nutty richness that pairs beautifully with the crispy cereal crunch.
Don’t like peanut butter? No worries! You can use almond butter, sunflower seed butter, or even cookie butter for a whole new vibe.
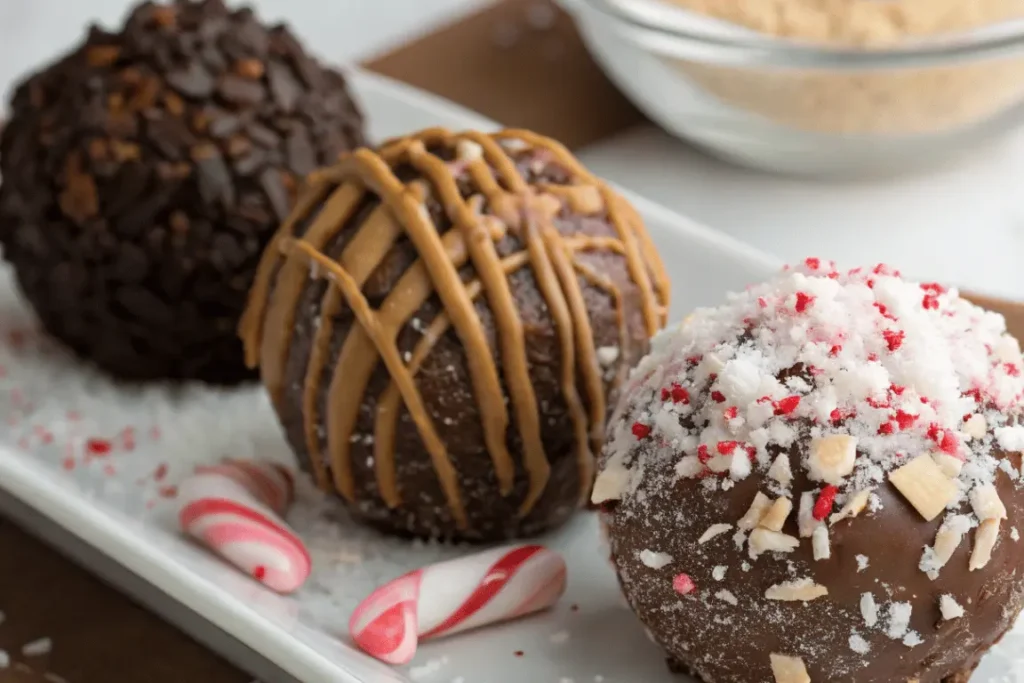
Holiday-Themed Chocolate Rice Krispie Balls
Looking to impress at a holiday party or potluck? Dress up your Chocolate Rice Krispie Balls for the season! Add red and green sprinkles for Christmas, pastel colors for Easter, or orange and black ones for Halloween. You can even roll them in crushed candy canes, chopped nuts, or shredded coconut for extra flair.
These themed treats aren’t just fun—they’re conversation starters and perfect edible gifts.
Vegan or Dairy-Free Variations
Going plant-based? No problem at all. Swap out the butter for coconut oil, and choose dairy-free chocolate chips. Use maple syrup or agave as a binder if you’re skipping marshmallows or condensed milk. There are even vegan marshmallows out there if you want to keep the classic gooey texture.
So yes, even without dairy, you can still enjoy the magic of chocolate covered rice krispie balls without missing a beat.
For more no-bake chocolate treat inspiration, check out our Best Moose Farts Recipe, another crowd-pleasing sweet snack.
Storage Tips and Shelf Life
How to Store Chocolate Rice Krispie Balls Properly
Once your Chocolate Rice Krispie Balls are chilled and set, you’ll want to keep them fresh and tasty for as long as possible. The good news? They’re low-maintenance. Store them in an airtight container and place it in the fridge. This helps preserve their shape and texture, especially if you’ve used melty chocolate.
Layer the balls between sheets of parchment paper if you’re stacking them, so they don’t stick together.
Freezing and Reheating Tips
Need to make them ahead of time? Absolutely! These treats freeze beautifully. Just pop them in a freezer-safe container with parchment between layers. When you’re ready to eat, pull out a few and let them thaw at room temperature for about 10–15 minutes. They’ll be just as chewy and chocolaty as the day you made them.
That said, you don’t need to “reheat” them—but letting them sit out a bit softens the chocolate coating nicely.
Shelf Life for Freshness
At room temperature, Chocolate Rice Krispie Balls can last up to 3 days in a cool, dry spot. In the fridge, they’ll stay fresh for up to a week. Frozen? You’ve got a solid month or more of snack-time ready to go.
Troubleshooting Common Issues
Why Won’t My Balls Stick Together?
Sometimes, despite your best efforts, Chocolate Rice Krispie Balls just won’t hold their shape. Don’t worry—it’s usually an easy fix. If the mixture feels too dry, you may not have enough binder (like melted chocolate or peanut butter). Adding just a bit more of either can help things stick.
Also, be sure to let the chocolate mixture cool slightly before mixing. If it’s too hot, it can make the cereal soggy. And if it’s too cool, it might not coat the cereal evenly. Timing really is everything here!
Fixing Dry or Crumbly Texture
No one wants a chalky or crumbly dessert. If your rice krispie dessert balls fall apart, it could be due to dry cereal or not enough moisture in the mix. Try warming your ingredients a bit longer to ensure they blend well.
On the flip side, if your treats are overly sticky or mushy, you might’ve used too much liquid. Next time, go lighter on the marshmallows or sweetened milk and let the mix rest for a few minutes before shaping.
Avoiding Overly Hard Chocolate Coating
If your chocolate shell sets up too hard, try melting it with a teaspoon of coconut oil next time. It softens the shell and makes biting into the Chocolate Rice Krispie Balls much more pleasant. Plus, it adds a nice little flavor boost too!
Serving Suggestions and Presentation Ideas
How to Present for Gifting or Parties
Chocolate Rice Krispie Balls are adorable on their own, but they really shine when you dress them up. For gifting, place them in mini cupcake liners and arrange them in a festive box or tin. Tie it all up with a ribbon, and boom—instant holiday cheer!
At parties, serve them on a tiered dessert tray alongside other no-bake chocolate balls or cookies. It makes your dessert table look fancier than it actually is, which, let’s face it, is half the fun!
You can even insert toothpicks or mini skewers to turn them into cake-pop-style bites—perfect for grabbing and snacking without sticky fingers.
Pairing with Other Desserts
If you’re putting together a dessert spread, these little guys pair great with items like fudge squares, brownies, or sugar cookies. Their light crunch and creamy chocolate flavor help break up denser treats.
Want more bite-sized goodies? You might enjoy our Best Moose Farts Recipe, which has a similar rich texture and chocolate base.
Making Mini or Jumbo Versions for Variety
For a twist, try shaping Chocolate Rice Krispie Balls into smaller or larger portions. Mini ones are perfect for kids, while jumbo balls can be a showstopper when dipped halfway in melted chocolate and rolled in sprinkles. Variety keeps things fun—and makes every bite a little different.
Healthier Alternatives
Lower-Sugar or Sugar-Free Versions
Trying to cut back on sugar? You’re not alone—and luckily, there are easy tweaks to make Chocolate Rice Krispie Balls a bit healthier. First, choose sugar-free chocolate chips or use dark chocolate with a high cocoa content. You can also replace sweetened condensed milk with natural nut butter and a touch of honey or maple syrup.
Skip the marshmallows altogether and add more peanut butter or almond butter for that sticky texture. It’s just as tasty but lighter on sugar.
Using Dark Chocolate or Coconut Oil
Dark chocolate not only cuts sugar but also adds antioxidants. Melt it with a small amount of coconut oil for a smooth, glossy coating that’s easier to bite through. The coconut oil helps soften the chocolate shell, making each bite of these chocolatey cereal snacks even better.
Bonus? Coconut oil also adds a subtle flavor twist—rich, tropical, and totally delicious.
Whole Grain or Cereal Swaps
Want to boost the fiber? Swap out the standard puffed rice with a whole grain cereal or a brown rice version. The texture will stay just as crispy, but you’ll get an extra nutritional kick without losing that classic crunch.
FAQs – People Also Ask
Q: Can I use cocoa powder instead of chocolate chips?
You can, but you’ll need to adjust the recipe. Cocoa powder alone isn’t sweet or fatty enough to bind ingredients. If you’re skipping chips, melt butter or coconut oil and mix with cocoa powder and a sweetener like honey or syrup. The texture and taste will differ, but it still works in a pinch for Chocolate Rice Krispie Balls.
Q: How do I keep Rice Krispie Balls from falling apart?
If your balls won’t stick, it’s usually a moisture issue. Make sure the chocolate mixture is warm but not hot when mixing. Also, press the mixture firmly when shaping. Letting it chill before serving helps it firm up nicely.
Q: Are these treats gluten-free?
The answer is: it depends. Rice Krispies cereal often contains malt flavoring, which isn’t gluten-free. To be safe, buy a certified gluten-free puffed rice cereal. Also, double-check your chocolate and other ingredients to make sure they’re gluten-free.
Final Thoughts and Recipe Card
Making Chocolate Rice Krispie Balls is as easy as it is fun. With just a few basic ingredients and no oven required, these bite-sized treats are perfect for any occasion—whether it’s a holiday, a school event, or just a cozy night in. You can keep things classic or get creative with flavors, toppings, and mix-ins.
From peanut butter twists to vegan-friendly options, there’s a version for everyone. And the best part? They’re quick to prep, easy to store, and always a crowd-pleaser.
So, grab your mixing bowl, melt that chocolate, and start rolling. Once you make a batch, you’ll see why these no-bake chocolate treats are a household favorite. Happy snacking!